

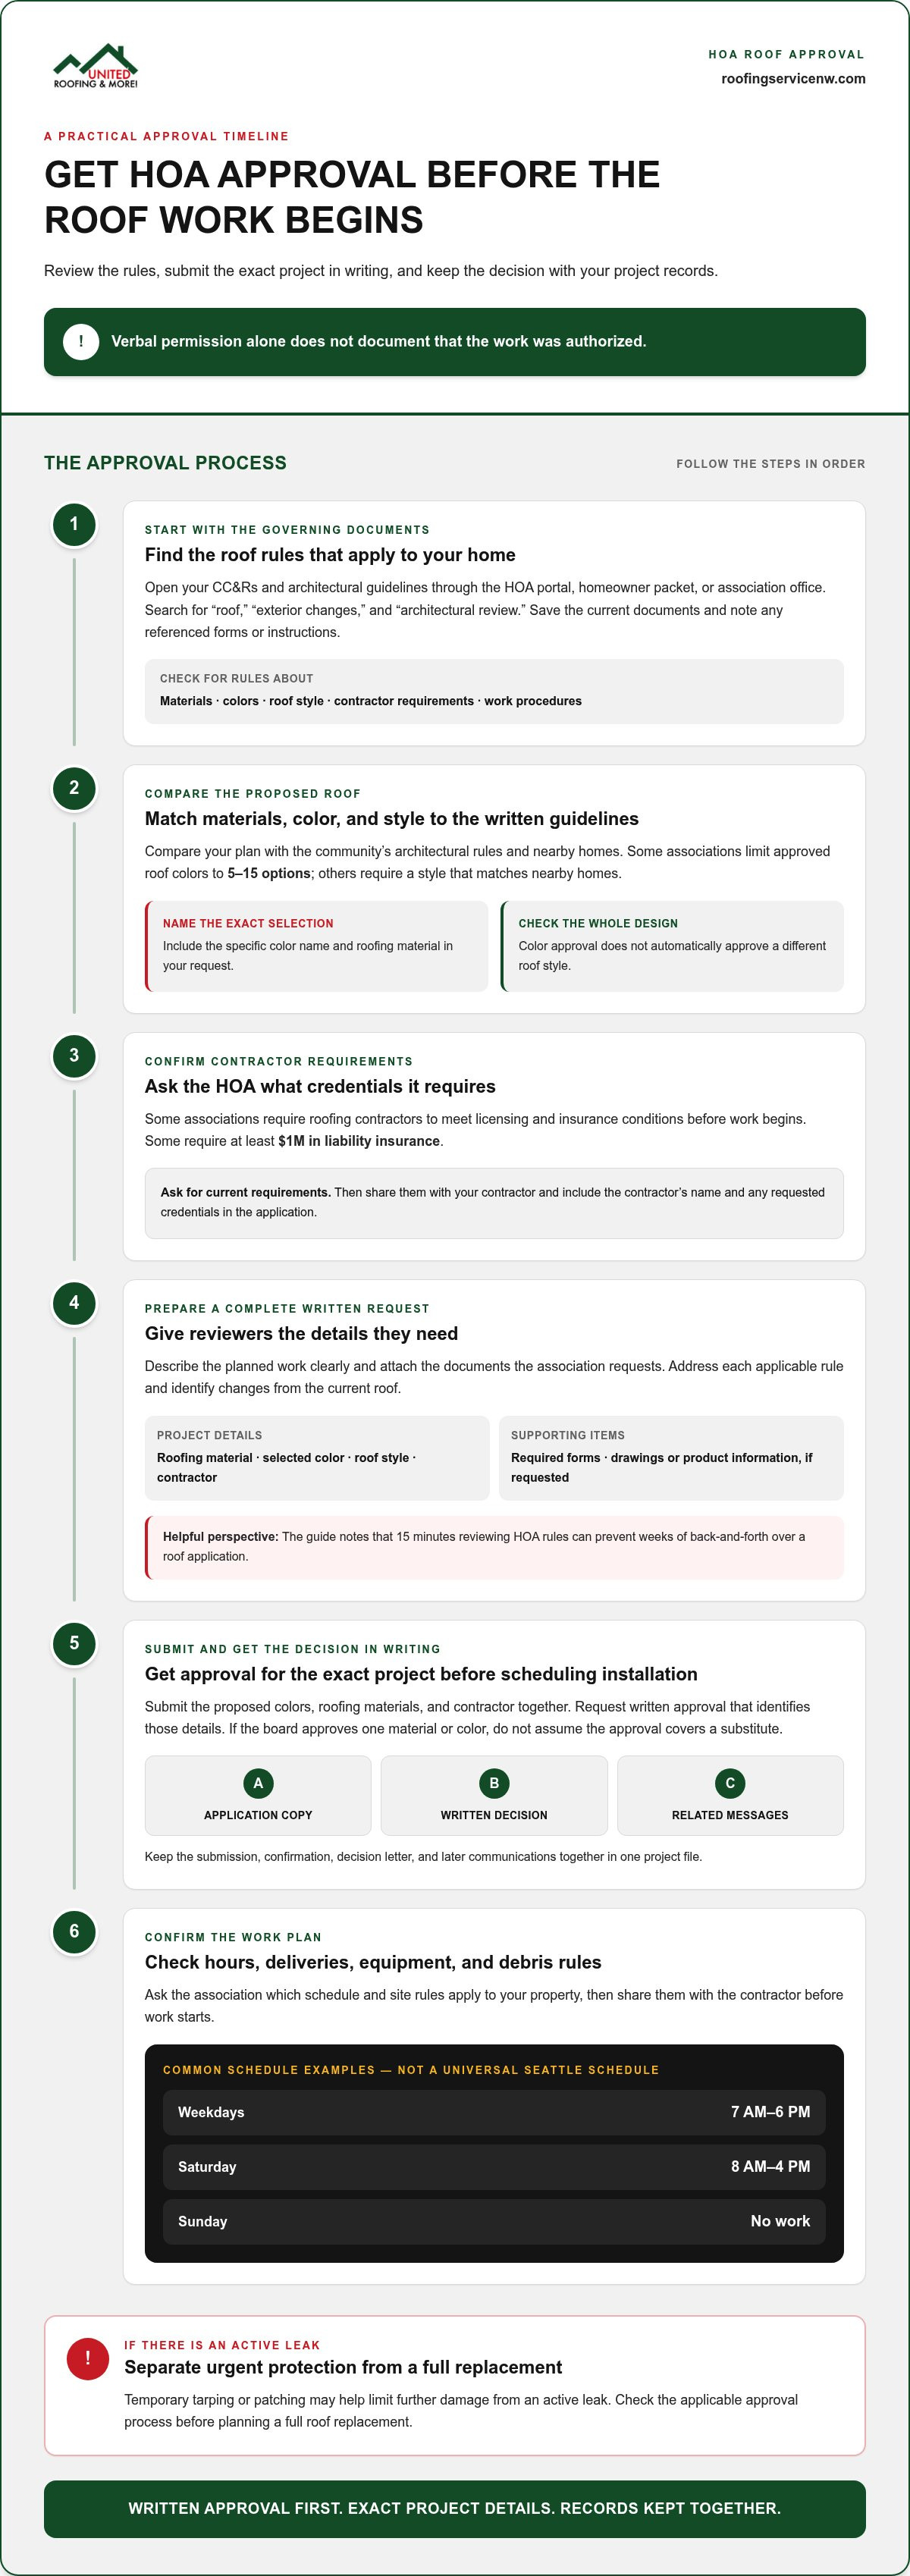
The best way to prevent an HOA dispute is to get written approval before the roofing work begins. For getting HOA approval for a new roof, review your community’s rules, submit the required project details, and save the approval and related communications. Verbal permission alone does not document that the work was authorized.
It’s easy to focus on choosing a roof and overlook the paperwork, especially when replacement is urgent. But HOA rules may cover materials, colors, styles, contractor requirements, and work procedures. Making a decision before approval can lead to penalties or a demand to change the finished roof.
This guide explains how to review your governing documents, prepare and submit an approval request, and respond if the HOA raises concerns after installation. You’ll also learn which records to keep and how requirements may differ for single-family homes, townhomes, and condominiums in the Seattle area.
Key Takeaways
- Review your CC&Rs and architectural guidelines to identify roof rules before choosing materials or colors.
- Submit a complete written request, then keep the approval and HOA communications with your project records.
- Learn what penalties may follow unapproved work and how to respond if the HOA raises a concern after installation.
- Find out how roof responsibility can differ between single-family homes, townhomes, and condominiums.
- Separate urgent leak protection from a full roof replacement, which may still require advance approval.
Why Seek HOA Approval When Choosing a New Roof Color?
If your roof needs emergency repairs before HOA approval, arrange temporary tarping or patching to limit damage from an active leak. For an active leak, temporary repairs may help limit further damage, but check the applicable approval process before planning a full roof replacement.
- Review color and material restrictions before choosing. HOA rules may limit both the roofing materials and colors allowed on your home. Some associations restrict approved roof colors to 5-15 options, while others require a style that matches nearby homes. Compare the written guidelines with the samples and product details you’re considering. A color that looks suitable on a small sample may appear different across an entire roof, so include the specific color name and roofing material in your request.
- Ask what contractor requirements apply. Some HOAs require roofing contractors to meet licensing and insurance conditions before work begins. Some associations require at least $1M in liability insurance. Ask the association for its current requirements, then share them with your roofing contractor. Include the contractor’s name and any requested credentials in the application, so the board can assess the actual project rather than a general plan.
- Get written approval for the exact project. Submit the proposed colors, roofing materials, and contractor together. Request written HOA approval that identifies those details before scheduling installation. If the board approves one material or color, don’t assume that approval covers a substitute. Keep the submission, decision letter, and related messages in one project file. Those records show what the HOA reviewed if questions come up after installation.
- Confirm work hours and site rules. HOA schedules commonly allow roofing work from 7 AM to 6 PM on weekdays and 8 AM to 4 PM on Saturday, with no Sunday work. Treat those as common examples, not a universal Seattle schedule. Ask the association which hours apply to your property and whether it has rules for deliveries, equipment, or debris. Share the schedule with the contractor before work starts to reduce avoidable disruptions.
- Choose a contractor familiar with HOA requests. Ask whether the roofing contractor has handled HOA projects and can help organize the required project details. A contractor can help process HOA requirements and align the roof replacement plan with the association’s guidelines. Familiarity can make it easier to prepare a clear application, identify missing materials, and communicate about requested changes. It doesn’t replace your responsibility to obtain written approval before installation.
What Kind of Roof Rules Do HOAs Have?
Start with the governing documents, then compare your planned roof replacement with the community’s architectural guidelines. These steps can help you find the applicable rules and prepare a complete application for the homeowners association to review.
-
Locate the Governing Roof Documents
Open your CC&Rs and architectural guidelines through the HOA portal, homeowner packet, or association office. Search for terms such as “roof,” “exterior changes,” and “architectural review.” CC&Rs may set requirements for exterior modifications and specify penalties for noncompliance. Save the current documents together, and note any application forms or review instructions they reference.
-
Review Roof Style Guidelines
Compare your proposed roof with the styles used on nearby homes. HOA guidelines may require a replacement to match the neighborhood’s existing style. Check the documents for requirements about materials, appearance, and other design features. If surrounding roofs share a consistent profile, explain how your proposal relates to it. Approval of a color does not automatically mean a different roof style is allowed.
- Build a rule-by-rule checklist. List each requirement that applies to your project, including the materials, colors, and design details named in the documents. Use wording that closely matches the guidelines so your application addresses the association’s actual criteria. Add any required forms or supporting items to the checklist. This helps you catch omissions before submitting and keeps your request focused on the proposed roof.
- Prepare the architectural review application. Describe the planned work clearly and attach the documents the association requests. Include the roofing materials, selected color, roof style, and any required drawings or product information. Identify changes from the current roof instead of describing the work only as a replacement. A precise application gives reviewers details to compare with the written guidelines and can reduce avoidable follow-up.
- Organize your records and submission. Keep a copy of the completed application, attachments, and submission confirmation. Fifteen minutes reviewing HOA rules can prevent weeks of back-and-forth over a roof application. Record the date you submitted the package and save later messages with the same project file. If a requirement seems unclear, ask the association to identify the applicable document and section before you finalize the proposal.
- Compare the finished proposal with the rules. Before moving forward, check that the proposed design and application describe the same project. A roof replacement request should not leave the reviewer guessing about materials or style. If you’re planning a roof replacement, use the association’s written criteria to shape the project details you submit.
Fines and other consequences of unapproved roof work
Before roofing work begins, make sure the HOA has approved the proposed project in writing. A completed roof may still face a compliance challenge if the association’s records do not show authorization.
- Wait for written approval before scheduling installation. Verbal permission is not sufficient proof that the HOA approved your project. Get a written decision identifying the roof work and approved details, then save it with your application and governing documents. If the association approves a particular material or color, make sure the installation plan matches. Keep the approval accessible during the project, not just in an email inbox.
- Read the fine schedule in your governing documents. The applicable schedule depends on the association’s documents. Find the rule covering exterior changes, note how it describes violations, and keep a copy of the relevant covenants with your project records.
- Understand that a fine may not be the only consequence. An HOA may require approval before roof replacement, and proceeding without it can lead to penalties or a demand to redo the project. Differences between the installed materials and approved samples may also raise questions. If the HOA contacts you, read the notice carefully, preserve the email or envelope, and compare the concern with your approval and application documents.
- Respond with a clear record of your compliance efforts. Keep dated copies of every application, HOA message, submitted sample, decision, and project document. If the association says the roof differs from the approved plan, compare the specific materials, colors, and contractor details in both records. Reply in writing with the relevant documents and a concise explanation. Avoid relying on a phone conversation alone; written records establish what was submitted and approved.
- Separate HOA authorization from permit requirements. Roof replacement may require a municipal building permit in addition to HOA approval. Keep permit records separate from the association’s written decision, since they address different requirements. If work has already started, pause unapproved changes, preserve project records, and promptly ask the HOA to explain its concern and next steps in writing. A municipal permit does not replace HOA approval.
State-specific HOA laws and roofing provisions
HOA rules and state protections vary, so distinguish local requirements from examples in other states. If your Seattle-area proposal is rejected, ask for the specific reasons and use them to prepare a documented response.
- Identify which rules apply to your property. Start with your HOA’s governing documents, then distinguish association requirements from state or municipal rules. A roof replacement may require a municipal building permit as well as HOA approval. Keep these processes separate: an HOA decision addresses community restrictions, while a permit addresses municipal requirements. Neither approval automatically replaces the other.
- Ask the board to explain a rejection. Request the specific reasons in writing before revising your roofing plan. Compare each reason with the restriction or architectural guideline the board cites. For example, the board may raise a concern about a shingle’s appearance or a proposed material. A clear explanation helps you decide whether to revise the design, provide more details, or dispute how the rule was applied.
- Prepare a focused revised proposal. Address each stated reason directly. If the concern involves a roofing material, provide an alternative or the requested product details. If the board questions the roof’s style, show how the revised plan relates to the applicable guideline. Keep the new application, prior decision, and correspondence together. This creates a clear record of what changed and why, including if review delays affect project scheduling.
- Check state-specific provisions without applying another state’s law to Seattle. Connecticut General Statutes section 47-6j prohibits HOAs from banning solar energy systems. New Jersey's Solar Access Law, cited as NJSA 45:22A-48.2, prohibits HOAs from effectively banning solar panels. These examples concern solar access, not blanket permission for any roof material or color. They do not establish the rule for a Seattle property.
- Use state examples as prompts, not substitutes for local rules. California has laws limiting how long an HOA can take to respond to an architectural request. Some governing documents deem a roof modification request approved if the review committee doesn’t respond within a specified period, typically 30-45 days. That timing depends on the documents and jurisdiction; don’t treat silence as approval without checking the applicable rule.
- Keep older roofing rules in context. Before May 26, 2022, Florida's 25% Roof Replacement Rule required complete roof system replacement when repairs exceeded 25% of the roof area. This historical Florida provision isn’t a Seattle roofing rule. For a local dispute, organize the HOA’s written reasons, your proposal, and any relevant municipal permit records before responding.
Who pays for roof replacement in an HOA: the homeowner or the association?
In a Seattle-area HOA community, responsibility depends on the property type and governing documents. Use these steps to determine who handles the roof and how related expenses are allocated.
- Identify your property type first. For a single-family home in an HOA, the homeowner typically pays for roof replacement, while the association may control aesthetic choices such as materials and colors. Payment responsibility and approval authority can belong to different parties. Don’t assume the HOA pays simply because it reviews your proposed roof. Check the documents for your specific home before planning the work.
- Read the documents that define roof responsibility. Review the CC&Rs, bylaws, and any maintenance responsibility sections available for your community. Look for language about roofs, exterior maintenance, common elements, and repair obligations. Note whether the documents assign upkeep to individual owners or the association. If they use terms such as “common element” or “shared roof,” read the surrounding provisions too, since context can clarify which areas and expenses they cover.
- For a condominium, check whether the roof is a common element. In U.S. condominium buildings, the HOA or condo association typically treats the roof as a common element. Replacement is generally funded through reserves or special assessments. Review the association documents to understand how the roof is classified and how replacement expenses are allocated. A unit owner’s responsibility for interior repairs does not by itself establish who pays for the building’s exterior roof.
- For a townhome, follow the association’s specific terms. Roof replacement responsibility varies according to the governing documents; roofs may be shared or managed by the HOA. Check whether the roof serving your home is treated as an individual component, a shared structure, or an association-managed element. Then review the related maintenance and expense provisions. Townhome communities can assign roof obligations differently, so another homeowner’s arrangement may not apply to your property.
- Confirm the payment path before committing to a project. If the documents assign replacement to the association, review how the association plans and funds the work, including any reserve or special assessment provisions. If they assign it to you, prepare for your own project costs and follow the HOA’s approval process separately. Keep the relevant clauses and written communications together. For homeowner-paid work, explore roof replacement options and available roofing financing as you plan the project.
United Roofing & More!: Roof Replacement
United Roofing & More! provides roof replacement and installation for residential and commercial properties in the Seattle Metropolitan Area. Once you’ve identified your HOA’s requirements and are planning the project, our roofing services can help with the work itself. If your roof has a leak or damage while you prepare, our roof repair service can address it. Roofing financing is also available for our services, giving you payment options to consider.
Keep your HOA’s written decision and approved project details with your records. Share those details as you plan the work so the roof project follows the approved scope. For roofing support, contact United Roofing & More!
Plan Your Next Roofing Step With Confidence
Getting HOA approval for a new roof is one part of a larger home project. Once you have the association’s decision, use the approved scope to coordinate your next steps and keep the work consistent with what the board reviewed. A clear plan can help move the project from paperwork to roofing work with fewer crossed wires.
United Roofing & More! offers roof replacement and installation, as well as roofing financing for its services. If you’re ready to discuss the roofing work for your home, bring your project details and HOA decision to the conversation. This gives you a practical starting point for planning work that aligns with the approved proposal.
Contact United Roofing & More! to discuss your roofing project. Take the next step with a clear plan and confidence in the decisions ahead.
Frequently Asked Questions
How do I protect myself after roof installation in case the HOA raises a compliance issue later?
Keep a dated record of what was installed and how it matched the approval. While seeking HOA approval for a new roof, save the decision and submitted proposal. After installation, add clear photos from several angles, the final material details, and the completion paperwork. If the HOA contacts you, respond in writing and refer to the relevant documents. An organized record makes it easier to address specific concerns.
Does my HOA require approval to replace or repair a roof?
A full roof replacement commonly requires advance HOA approval, while repair requirements depend on the community’s governing documents and the scope of work. Temporary tarping or patching to stop an active leak is generally allowed under emergency-repair provisions, but that does not authorize a full replacement. Before arranging non-emergency repairs, check whether the rules distinguish minor repairs from visible exterior changes, such as replacing shingles with a different color.
How do I find my HOA's roof replacement rules and architectural guidelines?
Look in your homeowner portal, closing or resale documents, and association communications for the current CC&Rs and architectural review materials. If you can’t locate them, send the HOA a written request naming the roof project and ask for the documents that govern exterior changes. Save the response with your records. A neighbor’s earlier approval may offer context, but it does not replace the rules that apply to your property.
What documents and information are needed for an HOA roof approval application?
Prepare a clear description of the work, proposed roofing material and color, contractor details, and product information or samples that show the roof’s appearance. Add photos of the current roof and any drawings requested by the association’s application. Check that every attachment refers to the same proposed project. For example, don’t submit a color sample that differs from the product named in your application, as that can create confusion during review.
How long does HOA approval for a new roof usually take?
Roofing proposal reviews generally take 15-30 days, while overall roof replacement approval commonly takes 30-90 days. Architectural requests more broadly are often processed within 30 to 60 days. The stages and timing can differ: an incomplete application, a board meeting schedule, or a request for revisions can extend the process. Submit a complete package early, and ask the association how it handles review and communicates its decision.
Can an HOA restrict roofing materials, colors, styles, or contractors?
Yes. HOA governing documents and architectural guidelines can set limits on exterior materials, colors, roof styles, and contractor qualifications. Some communities require a new roof to match the style of nearby homes; some also set contractor insurance requirements. Read the specific language that applies to your property and include those details in your application. An approved color, for example, does not necessarily mean every roofing material is allowed.
What roofing materials and colors are commonly approved by HOAs?
There isn’t one roofing material or color approved across all HOAs. Associations set their own standards, often aiming for materials and colors that fit the neighborhood’s existing appearance. Some limit approved roof colors to 5-15 options. Compare your intended product and color with the community guidelines, then submit the exact selection and a sample or product description. Nearby roofs can provide visual context, but the written criteria are the guide.
What are the risks of replacing a roof before HOA approval?
Starting without written approval can lead to HOA penalties and a requirement to alter or redo the roof. The finished installation may also be challenged if its color, material, or style differs from the association’s standards. Keep the project paused until approval is documented, and don’t rely on a verbal conversation as authorization. If work has already begun, preserve the application and project records, then respond promptly to any written notice.


