
What if the safest roof inspection starts with your feet firmly on the ground? A residential roof inspection checklist can help you spot visible changes without climbing a ladder or trying to diagnose damage yourself. In the Pacific Northwest, persistent rain, wind, moss, and fallen debris can make it harder to know what deserves attention.
It’s understandable to wonder which areas to check and whether a stain, patch of moss, or damaged-looking shingle signals a serious problem. A careful visual review can help you notice concerns, but it can’t reveal everything beneath the roofing or around details that are difficult to see.
This practical checklist walks you through a safe, repeatable ground-level check, from shingles and roof edges to gutters and visible flashing. You’ll also learn what to record, which warning signs merit timely attention, and when a roofing professional can assess the concern more closely. The goal is to document what you see, avoid unnecessary risks, and make an informed next-step decision without assuming every issue means you need a new roof.
Key Takeaways
- Use a residential roof inspection checklist to organize a visual review without walking on the roof.
- Learn which rain, moss, and wind-related changes are useful to note, and why they don’t confirm the cause of a problem.
- Sort observations into routine changes, signs to monitor, and concerns that may need timely professional attention.
- Build a repeatable inspection routine with dated photos from safe, consistent viewpoints.
- Choose a next step based on what you observe, and seek a roofing professional’s assessment before deciding whether repairs or replacement are needed.
Residential Roof Inspection Checklist: What Homeowners Can Check Safely
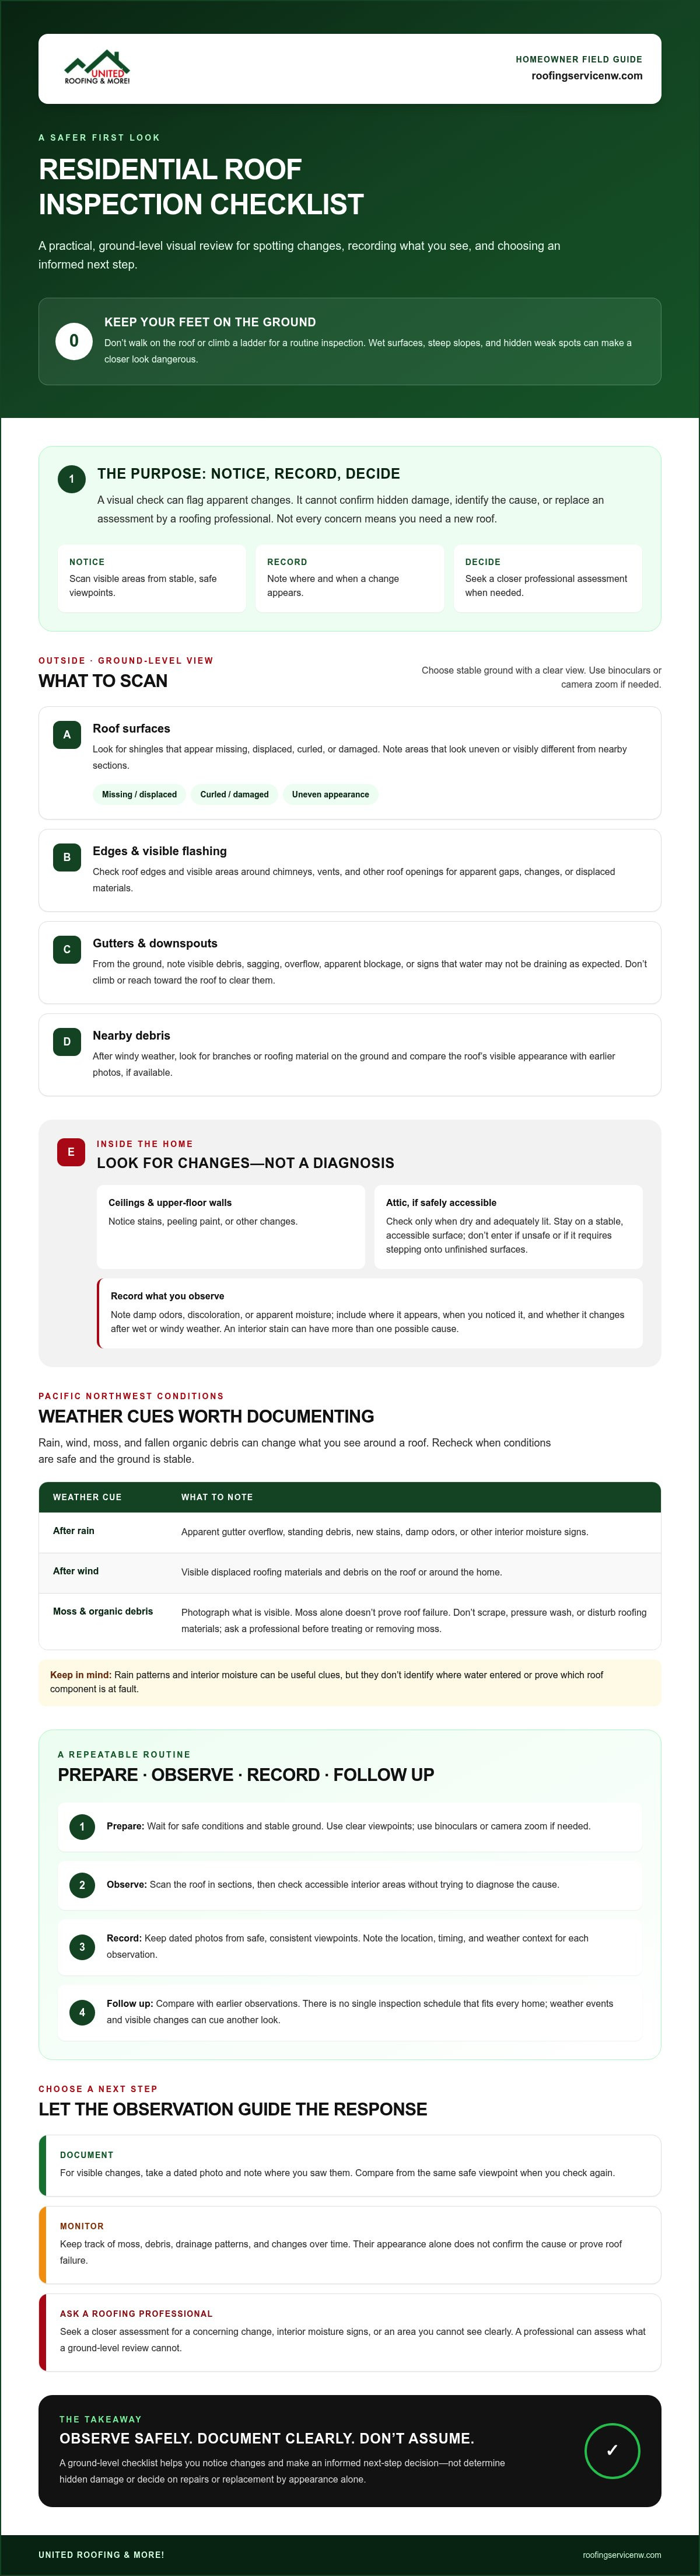
A visual roof check has a straightforward purpose: notice changes, record what concerns you, and decide whether to seek an expert assessment. This residential roof inspection checklist is for viewing the roof from the ground and checking accessible areas inside your home. Don’t walk on the roof or climb a ladder for a routine inspection. Wet surfaces, steep slopes, and hidden weak spots can make a closer look dangerous.
What you can see depends on the roof shape, weather, landscaping, and safe viewpoints around your home. For a useful overview of how roof shapes and construction affect what’s visible, see understanding roof construction. A visual check can flag apparent changes, but it can’t confirm hidden damage or replace an assessment by a roofing professional.
What to observe from the ground
Choose stable ground with a clear view. Use binoculars or your camera’s zoom if needed, and don’t step onto a slippery slope or unstable surface to improve your view. Scan the roof in sections, noting visible changes without trying to diagnose their cause.
- Roof surfaces: Look for shingles that appear missing, displaced, curled, or damaged. Note areas where the surface looks uneven or visibly different from nearby sections.
- Edges and visible flashing: Check roof edges and visible areas around chimneys, vents, and other roof openings for apparent gaps, changes, or displaced materials.
- Drainage: Observe gutters and downspouts from the ground. Note visible debris, sagging, or signs that water may not be draining as expected.
- Nearby debris: After windy weather, look for branches or roofing material on the ground. Compare the roof’s visible appearance with earlier photos if you have them.
What to check inside the home
Look at ceilings and upper-floor walls for stains, peeling paint, or other changes. If you can safely access the attic, check only when it’s dry and adequately lit. Stay on a stable, accessible surface, and don’t enter areas that feel unsafe or require stepping onto unfinished surfaces.
Notice damp odors and visible changes to attic surfaces, such as discoloration or apparent moisture. Record where each sign appears, when you noticed it, and whether it changes after wet or windy weather. An interior stain can have more than one possible cause, so treat it as a useful observation, not proof of where water entered.
Keep notes and dated photos from safe, consistent viewpoints. If you spot a concerning change or can’t see an area clearly, a professional roofer can assess what may be happening beyond what a ground-level check can show.
Pacific Northwest Roof Inspection Checklist for Rain, Moss, and Wind
In the Pacific Northwest, rain, wind, moss, and fallen organic debris can all change what you see around a roof. Add these weather-related observations to your residential roof inspection checklist, especially after significant weather. Wait until conditions are safe and the ground is stable. There’s no single inspection schedule that fits every home, so use weather events and visible changes as cues to take another look.
Rain and drainage: signs worth documenting
From a safe spot, observe whether gutters look sagging, overflowing, or blocked, and whether downspouts appear obstructed. Don’t climb or reach toward the roof to clear them. After rain, check accessible ceilings and attic areas for new stains, damp odors, or other changes. Record the location and when you noticed the sign. Repeated rain can make drainage patterns and interior moisture useful clues, but neither identifies where water entered or proves that a particular roof component is at fault.
For a broader reference on the systems a thorough home review may cover, consult HUD’s comprehensive roof inspection standards. A professional assessment can add context that a homeowner’s view from the ground cannot provide.
Moss, debris, and wind-related changes
Moss and organic debris are worth noting, but moss alone doesn’t prove roof failure. Photograph what you can see without scraping, pressure washing, or disturbing roofing materials. Cleaning methods can affect roof surfaces, so ask for professional advice before treating or removing moss.
- After wind: From the ground, look for visible displaced roofing materials and debris on the roof or around the home.
- After rain: Note apparent gutter overflow, standing debris, or new interior moisture signs.
- Over time: Compare dated photos taken from similar, safe viewpoints to see whether visible moss, debris, or roof changes appear to be spreading or shifting.
Keep your notes factual: what you saw, where it was, and what weather came before it. Avoid guessing at the cause. If a change concerns you, a roofing professional can assess the roof and discuss whether repair is appropriate. For help considering a roof concern, you can talk with a roofing professional.
Understanding Roof Inspection Signs Before Replacing
A stain, patch of moss, or shingle that looks uneven can be concerning, but none automatically means the roof needs replacement. A single visible sign can have several possible causes, and its location, extent, and changes over time matter. Use your residential roof inspection checklist to sort what you see into three categories: routine observations, changes to monitor, and concerns that call for professional evaluation.
| Observation | Homeowner action | When to seek help |
|---|---|---|
| Small, unchanged area of moss or a minor surface irregularity | Record its location and compare dated photos from a safe viewpoint. | Ask a roofing professional if it spreads or appears alongside other changes. |
| Ceiling stain or damp odor without obvious active water entry | Note where and when it appears, and check whether it changes after rain. | Arrange an assessment if it recurs, grows, or you’re unsure what’s causing it. |
| Active leak, substantial storm damage, or signs changing rapidly | Keep away from the affected area and document what you can safely observe. | Contact a roofing professional promptly. If there’s an immediate safety hazard, contact emergency services and don’t approach unstable areas. |
| Visible concern near a roof edge | Record the location without climbing or reaching toward the roof. | Seek professional advice if materials appear displaced or the concern worsens. |
Monitor, document, or call a roofer?
Monitoring may be reasonable for a minor visible change when there’s no active water entry or apparent material displacement. Take a dated photo and revisit it from the same safe viewpoint. Don’t delay if water is actively entering, storm damage is substantial, or signs are changing quickly. If the situation presents an immediate safety risk, stay clear and contact emergency services.
When a repair assessment may be appropriate
A roofing professional can assess the affected area, consider the surrounding roof condition, and discuss whether repair is appropriate. For an edge-related observation, this roof drip edge guide offers useful background, but it can’t determine what’s happening on your specific roof.
Consider replacement only after an assessment of the roof’s actual condition and a discussion of your priorities. One stain or irregular-looking shingle isn’t enough to conclude that a new roof is needed. Start with the evidence, ask for a clear explanation of the findings, and consider repair options before making a larger decision.
A Safe Roof Inspection Routine: Prepare, Record, and Follow Up
A consistent routine makes your observations easier to compare and more useful if you decide to consult a roofer. Keep the same safety limits each time: stay on the ground, use only accessible interior areas, and skip any step that feels unsafe. Your residential roof inspection checklist is a way to document visible changes, not a reason to climb onto the roof or enter a hazardous space.
A simple step-by-step inspection routine
Choose a dry day when the ground is stable and visibility is good. Follow the same order each time so it’s easier to notice what has changed.
- Observe from the ground: View roof sections, edges, and visible drainage from safe positions. Use camera zoom or binoculars rather than approaching the roof.
- Check accessible interiors: Look for changes in ceilings or safely accessible attic areas. Don’t enter an unsafe attic or step onto an unstable surface.
- Record what you notice: Save dated photos taken from consistent viewpoints. Add the location, date, recent weather context, and whether an interior sign changed.
- Keep records together: Store notes and photos in one place. If you later speak with a roofer, this record can help explain what prompted your concern.
Be specific, not diagnostic. For example, note “new ceiling stain below the back roof slope, noticed after rain” rather than guessing which roof component caused it. If you can’t observe an area safely, leave it for a professional.
How to prepare for a professional roof assessment
Share your dated photos, the location of visible changes, and any related interior moisture signs. Ask the roofer to explain what they observed, what possible causes they considered, and what next steps they recommend. You can also review this guide to roofing quality standards to help you think through workmanship questions.
A clear assessment can help distinguish a repair concern from a broader roofing issue. Recommendations should reflect the roof’s actual condition, not just one symptom. If your notes point to a roof repair concern, request a roof repair assessment and bring your observations to the conversation.
What to Do After Your Residential Roof Inspection
Your observations are a starting point, not a diagnosis. Use this residential roof inspection checklist to decide whether to keep monitoring a minor change, ask a roofing professional to assess a concern, or step away from an immediate safety hazard. Keep your notes and photos together so you can explain what you saw and when it happened.
When to request a professional roof assessment
Consider contacting a roofer if you see damaged or displaced materials, notice recurring interior moisture, or can’t safely view an area that concerns you. Describe the evidence rather than guessing at the source. For example, say where a stain appeared and whether it changed after rain. A roofer can assess conditions that aren’t visible from the ground and discuss possible next steps.
If there’s an immediate safety hazard, stay clear of the area and contact emergency services. For other concerns, confirm that the roofer serves your location before requesting service, especially if you’re checking availability in a specific city.
How to make a clear next-step decision
Ask the roofer to explain what they observed, what may be causing it, and whether they recommend a repair or replacement. Request a clear description of the proposed work and its scope before deciding how to proceed. Recommendations should follow an assessment of the roof’s actual condition. A visible symptom alone doesn’t establish that replacement is needed.
If an assessment identifies substantial damage or raises the possibility of a new roof, use this complete roof replacement guide as a separate resource while you consider your options. Make the decision with the assessment findings in hand and your priorities for the home in mind.
United Roofing & More! is a locally owned and operated Pacific Northwest roofing contractor that provides roof repairs, replacement, and installation. If you have a concern, you can discuss what you observed and ask what kind of assessment may be appropriate. If a roofing project is recommended, ask about available roofing financing as part of planning. Financing can help with project planning, but it doesn’t replace an evaluation of the roof’s condition.
Keep the conversation practical: share your notes, ask questions, and take time to understand the recommendation. If you’d like to discuss a roof concern, reach out to United Roofing & More! and ask about project financing if it’s relevant to your next steps.
Take the Next Step With Confidence
A safe roof check is about spotting visible changes, not diagnosing damage from a ladder. Use your residential roof inspection checklist to observe from the ground, note any interior signs, and keep dated photos so you can compare changes over time. If you find recurring moisture, displaced materials, or something you can’t assess safely, a roofing professional can evaluate the roof’s condition and explain whether repair or replacement may be appropriate.
United Roofing & More! is a locally owned and operated Pacific Northwest roofing contractor providing roof repair, replacement, and installation services. The company serves homeowners and businesses in Marysville, Seattle, Renton, Everett, Lynnwood, Kirkland, Mount Vernon, Bothell, Edmonds, Shoreline, Sammamish, Redmond, Bellevue, Tacoma, and Kent. If you have questions about what you’ve noticed, talk with United Roofing & More! about your roof concerns. If a roofing project is recommended, you can also ask about roofing financing as you consider your options.
Stay observant, keep good records, and take the next step that fits your roof’s actual condition. A clear assessment can help you move forward with greater confidence.
Frequently Asked Questions
How often should you inspect a residential roof?
Check your roof periodically and after significant rain or wind, but there’s no single schedule that suits every home. Choose safe, dry conditions and look for visible changes from the ground. Also notice new interior moisture signs after wet weather. If the roof is difficult to view, or you’re unsure how often it needs a closer review, ask a roofing professional for guidance based on its condition and design.
Can I inspect my roof myself without climbing onto it?
Yes. You can do a useful visual check from stable ground and look for interior signs in areas you can access safely. Use binoculars or camera zoom rather than climbing onto the roof. Don’t use an unstable ladder, walk on roofing, or enter an unsafe attic. A ground-level check can help you document concerns, but it can’t confirm hidden damage or replace a professional assessment.
What should I look for during a roof inspection?
Look for shingles that appear missing, curled, displaced, or damaged, along with visible changes around roof edges, chimneys, vents, and flashing. From the ground, note gutters that look blocked, sagging, or overflowing, as well as moss or debris. Inside, check for ceiling stains, peeling paint, damp odors, or visible attic changes if the area is safe to access. Record locations and dates without assuming a cause.
Can moss damage a roof?
Moss is worth monitoring because growth can hold moisture against roofing materials, but seeing moss alone doesn’t prove the roof has failed or needs replacement. Photograph visible growth from a safe viewpoint and compare images over time. Don’t scrape, pressure wash, or disturb roofing materials yourself. If moss is widespread or you notice other changes alongside it, ask a roofing professional to assess the roof and discuss suitable next steps.
What should I do if I find a roof leak?
If water is entering, keep clear of electrical hazards and move belongings only if you can do so safely. Note where and when you see the moisture, and take photos from a safe position. Don’t climb onto the roof or try to locate the entry point yourself. Contact a roofing professional to assess the concern. If there’s an immediate safety hazard, stay away from the area and contact emergency services.
Does seeing a damaged shingle mean I need a new roof?
No. A damaged-looking shingle can be a reason to seek an assessment, but it doesn’t automatically mean the whole roof needs replacement. The right next step depends on the affected area and the roof’s overall condition. Avoid diagnosing from the ground. A roofer can assess the visible concern, explain possible causes, and discuss whether a repair may be appropriate or whether broader work should be considered.
What should I tell a roofer when requesting an inspection?
Describe what you observed, where it appeared, when you noticed it, and whether it changed after rain or wind. Share dated photos and mention related signs, such as a recurring ceiling stain. Don’t guess at the source. Ask what the assessment includes and request a clear explanation of findings and recommended work. If you’re in Marysville or a Greater Seattle-area community, confirm service availability for your location before arranging a visit.


